VLISP provides a tool for previewing dialog boxes defined with DCL. To see how this works, copy the following DCL code into a new file in the VLISP text editor:
hello : dialog {
label = "Sample Dialog Box";
: text {
label = "Hello, world";
}
: button {
key = "accept";
label = "OK";
is_default = true;
}
}
This DCL file defines a dialog box labeled ‚ÄúSample Dialog Box.‚ÄĚ It contains a text tile and an OK button. Save the file as hello.dcl, and specify ‚ÄúDCL Source Files‚ÄĚ in the Save As Type field of the Save As dialog box.
Note how the text editor color codes the statements in the DCL file. The default color coding scheme is shown in the following table:
|
DCL default color coding |
|
|---|---|
|
DCL element |
Color |
|
Tiles and tile attributes |
Blue |
|
Strings |
Magenta |
|
Integers |
Green |
|
Real numbers |
Teal |
|
Comments |
Magenta, on gray background |
|
Parentheses |
Red |
|
Preprocessor |
Dark blue |
|
Operators and punctuation |
Dark red |
|
Unrecognized items (for example, user variables) |
Black |
Choose Tools
 Interface Tools
  Preview DCL in Editor to display
the dialog box defined in the text editor window. Because you may
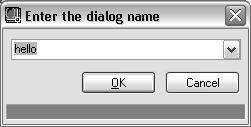
have more than one dialog box defined in a single .dcl file, VLISP prompts you to specify the name of the
dialog you want to view:

If your DCL file contains definitions for multiple dialog boxes, click the pull-down arrow and choose the one you want to preview. There is only one dialog box defined in hello.dcl, so choose OK to view it:

Choose OK to complete previewing the dialog box.
Although buttons are a good way to demonstrate dialog box attributes, there are standard exit button subassemblies you should use in your dialog boxes. You can create a dialog box that is virtually the same as the one shown in the previous figure by using the ok_only subassembly. See Dialog Box Exit Buttons and Error Tiles.