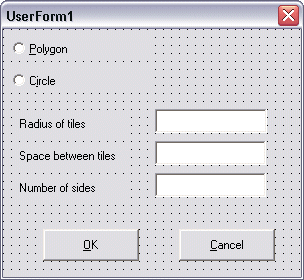
The dialog
box you create contains two option buttons (if you select one, the
other is cleared) for choosing the tile shape: circle or polygon.
The dialog box also contains three text boxes for entering the
following numeric values: the radius of the tiles, the spacing
between the tiles, and the number of sides on the tile (which is
available only if the Polygon option button is selected).
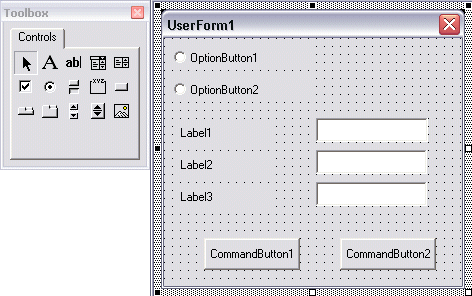
To create a
dialog box from the VBA IDE
On the Insert menu, click User Form to open a new form. Two
windows, a toolbox, and a blank user form are displayed.
One by one, select and drag the following controls from the
toolbox and place them on the user form. You should place two
option buttons (
), three labels (
), three text boxes (
), and two command buttons (
), as illustrated on the following form:
Close the toolbox.
To set the
properties for the radio button controls
On the user form, select the OptionButton1 control. On the View
menu, click Properties Window, and change the following properties
for OptionButton1:
(Name) =gp_poly
Caption =Polygon
ControlTipText
= Polygon Tile Shape
Accelerator =P
On the user form, select the OptionButton2 control. In the
Properties window, change the following properties for
OptionButton2:
(Name) =gp_circ
Caption =Circle
ControlTipText
= Circle Tile Shape
Accelerator =I
To set the
properties for the label controls
On the user form, select the Label1 control. In the Properties
window, change the following properties for Label1:
(Name) =label_trad
Caption =Radius of tiles
TabStop =True
On the user form, select the Label2 control. In the Properties
window, change the following properties for Label2:
(Name) =label_tspac
Caption =Space between tiles
TabStop =True
On the user form, select the Label3 control. In the Properties
window, change the following properties for Label3:
(Name) =label_tsides
Caption =Number of sides
TabStop =True
To set the
properties for the text box controls
On the user form, select the TextBox1 control. In the
Properties window, change the following property for TextBox1:
(Name) =gp_trad
On the user form, select the TextBox2 control. In the
Properties window, change the following property for TextBox2:
(Name) =gp_tspac
On the user form, select the TextBox3 control. In the
Properties window, change the following property for TextBox3:
(Name) =gp_tsides
To set the
properties for the command button controls and the form window
On the user form, select the CommandButton1 control. In the
Properties window, change the following properties for
CommandButton1:
(Name) =accept
Caption =OK
ControlTipText
= Accept the options
Accelerator =O
Default =True
On the user form, select the CommandButton2 control. In the
Properties window change the following properties for
CommandButton2:
(Name) =cancel
Caption =Cancel
ControlTipText
= Cancel the operation
Accelerator =C
Select the user form itself by clicking on the background of
the form, away from any control. In the Properties window, change
the following properties for the form: